
Delivery Application Through an Instant Clone Based RDS Server Farm
- Barry Ling

- Apr 13
- 4 min read

The Horizon platform is not only capable to delivery VDI desktop. It is also capable to delivery applications as well.
To do this, you will need a Windows Server to install the applications you are going to delivery. Then you will need to install the Horizon agent on the Windows server, adding it to the Connection Server as an RDS farm. And finally delivery the application through Horizon.
I will walk you through the procedure in this blog. And the procedure will assume you are utilizing an Instant Clone based RDS farm. The beneifit of uding Instant Clone is you can automatically adjusting the number of RSD server base on actual loading. And if any application upgrade or system changes, you can do this on the master image and easily roll out to all RDS server by refreshing them from master image.
1. Prerequisites actions
The first step you need to do is preparing a Windows VM as the master image. Please follow the blog below to prepare your master image VM.
And during the Horizon Agent installation, please make sure you have select the option of "Instant Clone Agent".

The next step you will need to add an account in Connect Server for the Instant Clone actions.
Login to the Connection Server admin UI.
Navigate to "Setting" -> "Domains".
Click "Add".

Select the corresponding domain the Horizon serving.
Input the account name and password.
Click "OK".

**** Please make sure the account added meet the minimal user right listed in the following Omnissa KB.
You will see the account is added successfully.

2. Creating an Instant Cloned based RDS Farm
The next step will be creating an RDS farm on the Connection Server.
Login to the Connection Server admin UI.
Navigate to "Inventory" -> "Farms".
Click "Add".

Select "Automated Farm".
Click "Next".

Select "Instant Clone".
Select corresponding vCenter machine.
Click "Next".

Leave default and click "Next".

Input a unique name for the RDS farm.
Click "Next".

Leave default and click "Next".

Provide a naming pattern for the hostname of the RDS server going to be created. The example here is "TestingRDSH-{n:fixed=2}. Which means the RDS server created will be named as TestingRDSH-01, TestingRDSH-02, TestingRDSH-03, and so on.
Confrim the maximum and minimum number of RDS server allowed. This value can be change anytime after this initial setup procedure.
Click "Next".

Click "Browse" and select the master image VM.
Click "Browse" and select the snapshot created for Instant Clone..
Click "Browse" and select the vCenter folder you are going to place the RDS servers created.
Click "Browse" and select the vCenter Cluster you are going to place the RDS servers created.
Click "Browse" and select the vCenter Resources Pool you are going to place the RDS servers created.
Click "Browse" and select the vCenter Datastore you are going to place the RDS servers created.

Input how many CPU and RAM resources you are going to assign to each RDS server.
Click "Next".

Select the corresponding domain the Horizon serving.
Click "Browse" and select the domain OU you are going to place the RDS servers created.
Select "Use ClonePrep".
Click "Next".

Review the setting and click "Submit" if everything ok.

After a while, you will see the RDS farm is created successfully.

3. Create Application Pools From RDS Farm
After the RDS farm is created, you can now adding the application for delivery.
Login to the Connection Server admin UI.
Navigate to "Inventory" -> "Applications".
Click "Add".
Select "Add from Installed Applications".

Select "RDS Farm".
Select the RDS farm you just created on last section. It will search and list out all the application available on the RDS server.
Click those applications you are going to delivery.
Click "Next".

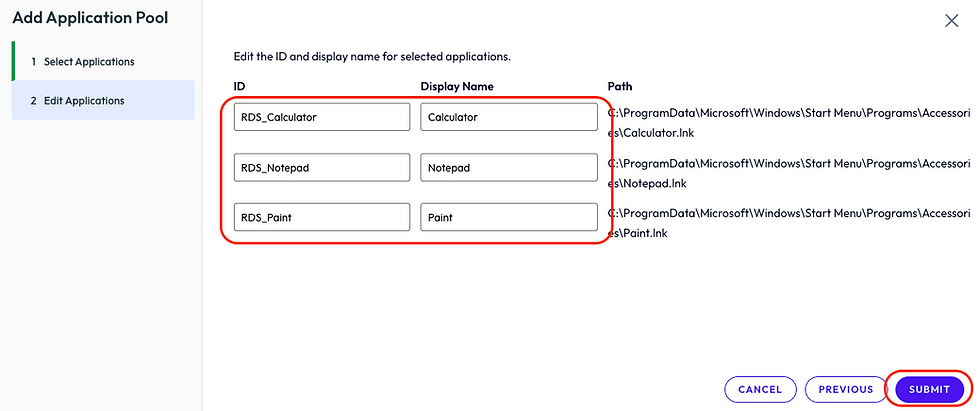
Input a unique name for application ID.
Input a display name for each application.
Click "Submit".
Click "Add".

Input a name in search bar to find the AD account / group you are going to give access to.
Select the AD account / group.
Click "OK".

Click "OK".

You will see the application pool is created and ready for deliver.

4. Create Desktop Pools From RDS Farm
Besides applications, you can deliver RDS desktop for end user as well.
Login to the Connection Server admin UI.
Navigate to "Inventory" -> "Desktops".
Click "Add".

Select "RDS Desktop Pool".
Click "Next".

Input a unique ID for the desktop pool.
Input a display name for the desktop pool.
Click "Next".

Leave default and click "next".

Select "Select an RDS farm for this desktop pool".
Select the RDS farm you created on pervious section.
Click "Next".

Check "Entitle Users After Adding Pool".
Click "Submit".

Click "Add".
Input a name in search bar to find the AD account / group you are going to give access to.
Select the AD account / group.
Click "OK".
Click "OK".
You will see the Desktop pool is created and ready for deliver.

----- END -----


Comments