
Horizon 8 Basic Installation
- Barry Ling

- Sep 8, 2025
- 3 min read
Updated: Apr 28

To make a Horizon platform for providing basic VDI service is not a difficult task. Just setting up a Connection Server is good enough to serve the purpose. And the process is relatively simple.
It involves following steps.
1. Basic installation
Let's start from the very beginning. Just download the Connection Server installation file from the Omnissa Download website. Prepare a Windows Server for the installation. And you can run the execute file as a administrator.

Click "Yes".
*** Please be reminded that from version 2506, a vaild license key from Omnissa is required if the Horizon is not under subscription license. Pervious VMware key is not longer applicable from this version.

Click "Next".

Click "Next".

Select "Horizon 7 Standard Server". Check "Install HTML Access". Select "IPv4". Click "Next".

Select "Single Pod Deployment......" if this is the first Connection Server.
Click "Next".

Setup a recovery password and input a password hint if needed.
Click "Next".

Select "Configure Windows Firewall automatically".
Click "Next".

Input a domain account or group to grant as the administrator of Horizon.
This AD account will be the default Horizon administrator account.
Click "Next".

.
Click "Next".

Click "Next".

Select "General".
Click "Install" to start the installation process.

Wait for the installation until finished. Click "Finish" to complete the process.
Up to now, the basic installation is complete. And the Horizon platform is ready to serve you.

Now you can access the Horizon Admin URL by "https://[Your server DNS name]/admin".

You may have a certificate warning at this stage. But don't worry, I will show you how to replace the self-signed cert at next session.
2. Replace the self-signed cert
To replace the certificate. The first step will be purchasing and install the 3rd party certificate into the base Windows of the Connection Server. Since there already many online documents covering this part, I will skip this process here.
Next step please stop the "VMware View Connection Server" service.

Open the command prompt and input "MMC". Press ENTER.

Within the MMC, click "File". Select "Add/Remove Snap-in".

Select "Certificate" and click "Add".

Select "Computer account". Click "Next".

Select "Local computer ......" and click "Finish"

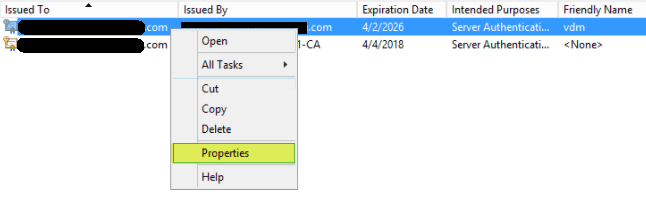
Within the console, locate a certificate with Friendly Name of "vdm". Right click the certificate and select "Properties.
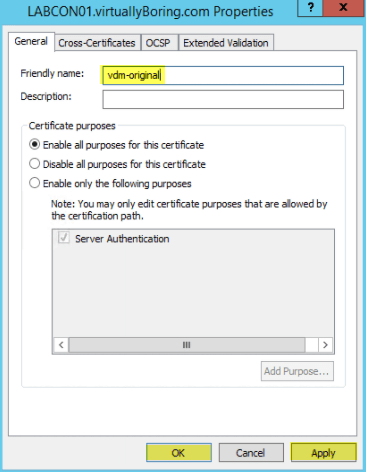
Change the friendly name as "vdm-original". Click "OK"
Look for the 3rd party cert you have imported. Right click the cert and select "Properties". Change the name to "vdm".

Last step, please start the "VMware View Connection Server" service.

3. Modify the security config files
By default, the Connection Server only allow accessing the GUI with it server name. If you are accessing it through UAG or other load balancer, you may need to modify the security config file by adding those server name.
Login to the Connection Server. Open File Explore and go to following file path.
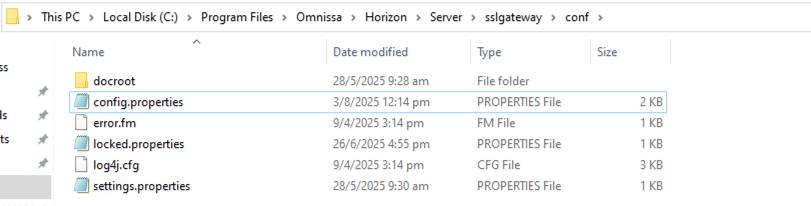
Look for "locked.properties" and open the file with Notepad.

Modify the setting to "ckeckOrigin=true"
Adding all the URL will be used to access the Connection Server into the file with format as:
portalHost.1=xxx.xxxxx.com
portalHost.2=xxx.xxxxx.com

Please restart the "VMware View Connection Server" service afterward.

4. Adding vCenter to Connection Server
The last session will back to configuration on Admin GUI. Please login to the Connection Server Admin GUI.
Navigate to "Setting" -> "Servers" on left pane.
Select "vCenter Servers".
Click "Add".

Input the vCenter Server address.
Input a vCenter account with appropriate right. Input the password.
Click "Next".

A pop up windows of certificate warning will appear..
Click "View Certificate".

Click "Accept".

Leave all setting as default.
Click "Next".

Click "Submit".

You will found the vCenter has been added to the Connection Server.

And now the Horizon platform is ready for desktop provisioning.
----- END -----


Comments